1
/
of
2
PROJECTA
PROJECTA Battery Tray fits Toyota 70 Series V8 HDBT122
PROJECTA Battery Tray fits Toyota 70 Series V8 HDBT122
Regular price
$387.95 AUD
Regular price
Sale price
$387.95 AUD
Unit price
/
per
Tax included.
Couldn't load pickup availability
Battery Tray for Manual Toyota Landcruiser 70 Series 1VD-FTV, 4.5 Litre V8 Turbo Diesel (ABS) Wagon/Ute (Oct 2016>)
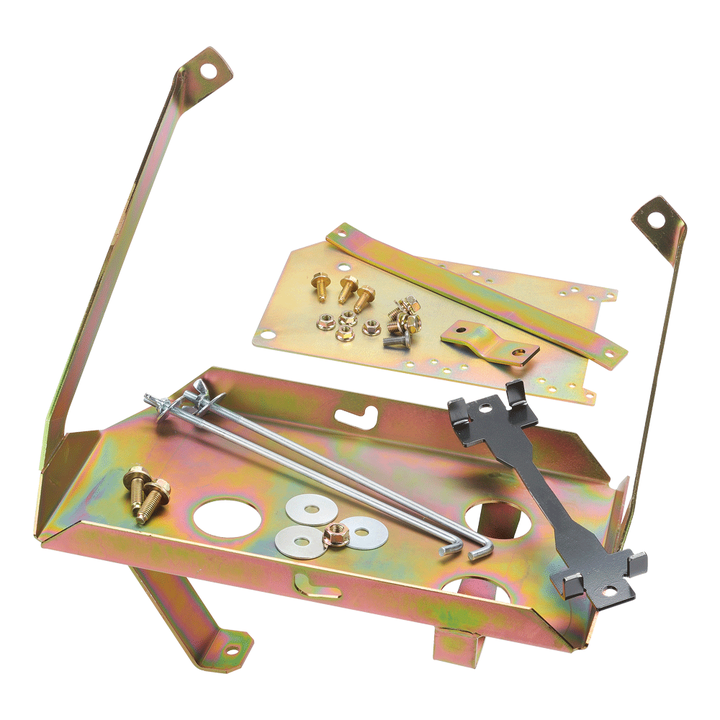
Custom-made for the Toyota Landcruiser 70 Series, the HDBT122 is designed and packaged for direct fitment to your vehicle, with minimal installation steps as opposed its non-vehicle-specific counterparts. To make the process even easier for you, your battery tray will come as a complete kit, with all the necessary mounting hardware (bolts, washers, additional brackets, plates, and hold-down clamps), for hassle-free, professional installation! Your new Toyota battery tray is made to last and perform, contrusted from heavy-duty 2mm dust, rust, and corrosion-resistant passivated zinc-coated steel.
Projecta are leading the industry with their superior aftermarket heavy-duty dual battery trays, which are the ultimate solution to safely, effectively, and securely mounting an auxiliary battery to a vehicle's engine bay. Engineered to fit specific vehicle types - Ford, Holden, Isuzu, Mazda, Mitsubishi, Nissan, and Toyota - the result is a battery tray that can be easily installed without having to modify the tray or part of the vehicle. However, if a tray for your specific vehicle is not available, or you're after a universal tray, Projecta have those covered, too!
KIT INCLUDES
Tray
Long Top Mount
Short Top Mount
Computer Mount
Top Mount
J Bolts
2 x M8 Bolts
2 x M8 Bolts Long
1 x M8 Nut
3 x M6 Bolts
1 x M6 Weld Nut
4 x M6 Nuts
3 x M6 Body Washer
SPECIFICATIONS
Max Battery Size (mm) L300x W174 x H220
Max Battery Weight 28Kg
Recommended batteries Optima D27M & Optima D31A
Approximate fitting time 1.5 hours
Recommended Dual Battery System P/No: IDC25, DBC150, VSR200
Tray Location Engine Bay, Passenger Side Rear
WARNINGS
Before installation, make sure that the vehicle is stationary and the wheels chocked.
Be careful when laying wires, not to cause any electrical shorts or wire breakage.
After installation ensure the bonnet can close without hitting the newly installed battery and battery tray.
FITMENT INSTRUCTIONS
1. Make sure that the vehicle is stationary, the engine is switched off and cool. Disconnect the negative terminal from the main battery.
2. Remover brackets on the inner guard holding 2 x 'Injector Driver' Computers. Disconnect plugs one computer has 3 plugs and the other has 4 plugs.
3. Remove computers from brackets (brackets not re-used, but retain screws).
4a. Grab the Supplied Computer mount and see how it is going to be mounted using the 10mm hole at the top.
4b. Locate the back of the bracket and mount the 3 plug computer on the back to the lower series of holes.
4c. Mount the 4 plug computer on the front of the bracket on the top series of holes with the plugs facing down.
5. Remove factory accessory fuse box from its bracket from the inner guard. The fuse box may be redundant when the dual battery system is completed. For the time being cable tie to the wiring harness between battery and intercooler.
6a. Undo 3 nuts holding wiring harness mount bracket to 2 studs on firewall (below wiper motor) and unclip harness from bracket.
6b. Adequately resecure harness to one of the firewall studs, using an insulated'P' clip (not supplied) or similar.
7. Bolt the short top mount support bracket into existing hole at the bonnet shut line between inner and outer guard, using 1 x M8 long bolt and nut. (Use a Philips screwdriver shaft down through the hole, feed the nut onto it and hold nut up in place, remove screw driver and replace with bolt).
8. Reconnect plugs to Injector Driver computers and bolt brackets in inner guard captive nuts, using 1 x M8 short bolt at front and 1 x M8 long bolt at rear (leave loose, as they need to be removed as tray arm fits over computer mount plate).
9. Manipulate wiring loom into wedged shaped space between firewall, inner guard and wheel arch to gain clearance for tray.
10. Place tray into position and bolt in upper arms with 1 x M8 short bolt for front arm of tray and 1 x M8 long bolt for rear arm of tray, the bolt needs to go through rear arm and the computer plate bolting to the inner guard captive nuts. The tray can be flexed slightly forward or back to aid clearance.
11. The fitter needs to ensure there is sufficient clearance between tray, wiring looms, fuel lines and air conditioning pipes. E.g. Ensure windscreen washer tube is not kinked or restricted when moving computers.
12a. Drill 3 x 6mm holes through the wheel arch, using the holes in the lower tray mounting plates as a guide.
12b. Fasten with 3 x M6 bolts, body washer and nuts. Washer and nuts to be on the underside of the wheel arch.
13. Place battery into tray. Secure the Top Mount and Long support bracket to battery with J bolts. Then use the M6 weld bolt and nut to join short and long top support brackets together. Note: Failure to fit the long and short top mounts correctly may result in metal fatigue of the vehicle and tray.
14. Reconnect the negative battery terminal to the main starter battery. Before closing the bonnet make sure the battery and tray does not hit the bonnet. You may now wish to fit your desired Dual Battery System.
Share